How To Properly Sight In A Multi-Line Drop-Compensating Scope
/ August 1st, 2019If your crossbow scope has windage and elevation adjustment knobs but does not have a speed adjustment dial, then you have a multi-line style drop-compensating scope. The TenPoint Multi-Line Scope and 3x Pro-View 3 Scope are examples of this style. The process for sighting in this type requires you to shoot at multiple distances and to make windage and elevation adjustments accordingly. It is important that you follow the proper steps for sighting in this style of scope if you wish to achieve the highest level of accuracy with your crossbow.
Begin the sighting process by setting your target at exactly 20-yards. Using the top horizontal line/dot, test-fire the crossbow and make any necessary windage or elevation adjustments until you are consistently hitting the bullseye.
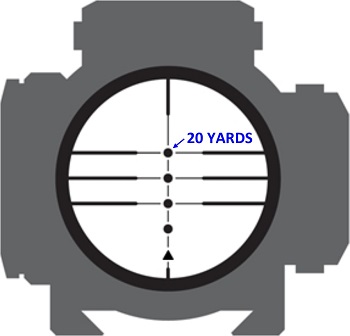
Use the top line/dot in your scope when first sighting in at 20-yards.
Next, determine the furthest possible distance that you might shoot in a hunting situation. If that distance is 40-yards, move your target to 30-yards. If that distance is 50-yards, move your target to 40-yards.
Use the second horizontal line/dot from the top to fine-tune your sight at 30-yards or the third horizontal line/dot from the top to fine tune your sight at 40-yards. Test-fire the crossbow and make any necessary windage or elevation adjustments until you are consistently hitting the bullseye.
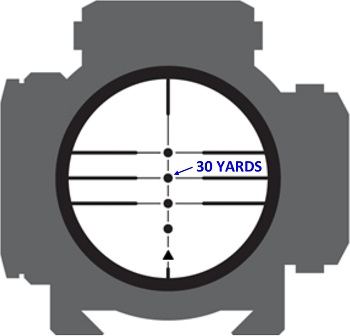
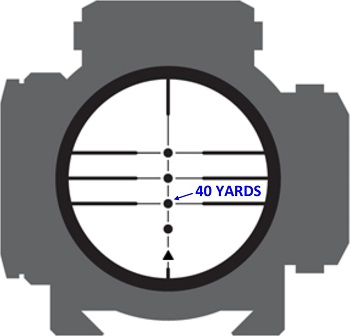
If you moved your target to 30-yards, use the second line/dot from the top. If you moved your target to 40-yards, use the third line/dot from the top.
Since a multi-line drop-compensating scope does not have an additional speed adjustment, it has been pre-calibrated for a fixed speed. For example, TenPoint’s Multi-Line Scope is calibrated for 330 feet-per-second and TenPoint’s 3x Pro-View 3 Scope is calibrated for 350 feet-per-second. This means that the closer your crossbow shoots to this speed, the closer each of the lines/dots on the scope will represent dead-on distances of 20-, 30-, 40-yards, and so on. The reason that you re-zero the scope at either 30- or 40-yards is to reduce any margin of error that may occur if you are using the other lines/dots in the scope to take a shot and your crossbow is not shooting close to the fixed, pre-calibrated speed.
![]()
After you have zeroed at 30- or 40-yards, move your target back to 20-yards and test-fire again using the top line/dot in the scope to verify your settings. You may hit slightly high or slightly low now at 20-yards, but your variance should not be enough that you would miss the animal’s vitals zone. Since you re-zeroed the scope at 30- or 40-yards, you know you will hit dead-on at the distance you chose.
The final step to verify your settings is to set the target at your maximum shooting distance and test-fire using the appropriate line/dot. For example, if you re-zeroed your crossbow at 40-yards, you should set the target at 50-yards and use the fourth line/dot down from the top for your sighting point. Again, you may hit slightly high or slightly low at 50-yards, but your variance should not be enough that you would miss the animal’s vitals zone. Once you have verified the point-of-impact of your furthest possible shot, your multi-line drop-compensating scope is sighted in.